


Dietitians Dish – October 4, 2021
Simply amazing salads!
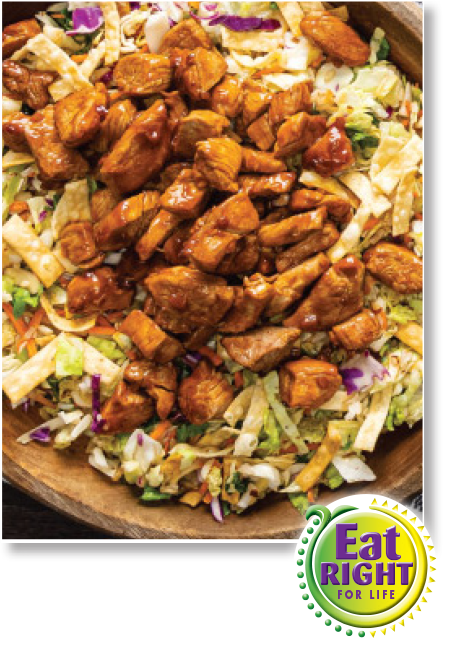
Having a simple and flavorful salad that is robust enough to be served as a meal is perfect for busy weeknights. Use a mix of packaged, convenience items and fresh prepared ingredients to make a delicious meal. Hopefully there will be enough left over for lunch too! You could even meal prep this for a week of lunches instead of serving for dinner.
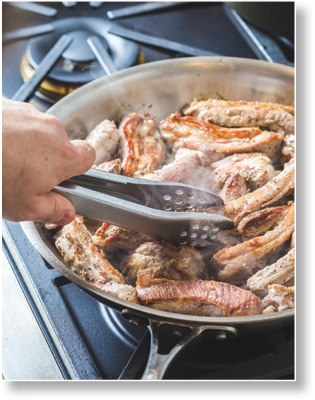
The secret – cut the pork into strips before cooking and used a bagged salad kit!
And, it could be an even quicker meal if you pre-cook the rice another day and reheat what you need when you’re ready to use it. The great thing about bagged salads is that they have a variety of flavor combinations and ingredients so you’re not buying more than you need of a lot of different items which could go to waste.
Thai Pork Salad
- 1 cup uncooked instant brown rice
- 1 Tbsp. coconut oil
- 1 pork tenderloin, quartered lengthwise and cut crosswise into 1/2-inch strips (about 1-1/4 pounds)
- 1/2 cup pad Thai sauce
- 1 bag (10.5 ounces) Asian chopped salad kit
Directions:
- Prepare rice as label directs.
- In large skillet, heat oil over medium-high heat; add pork and cook 7 minutes, stirring frequently. Add sauce; cook 2 minutes or until internal temperature of pork reaches 145°, stirring frequently.
- In large bowl, prepare salad kit as label directs; add rice and toss. Serve pork over salad. Makes about 7 cups.
Dietitians Dish – September 27, 2021
Get Kids in the kitchen for Family Meals Month !

Cauliflower can be used in many forms:
• Riced • Mashed • Grilled/Roasted • Steamed
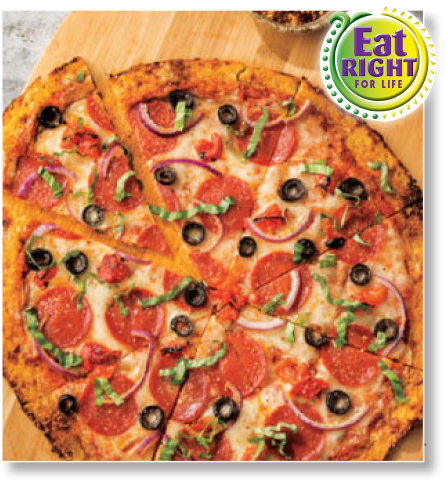
It’s a perfect ingredient for a better-for-you pizza crust. What a fun opportunity to get kids in the kitchen – make a pizza from scratch! Add some healthier toppings and create a masterpiece pizza that beats any take-out. Or, make smaller crusts; then, let everyone choose their favorite combination of flavors and toppings.
Turkey Pepperoni & Roasted Red Pepper Cauliflower Pizza
- 1 medium head cauliflower, coarsely chopped
- 1/4 cup water
- 3 garlic cloves, minced
- 2 large egg whites
- 3/4 cup shredded part-skim mozzarella cheese
- 2 Tbsps. grated Parmesan cheese
- 1-1/2 tsps. olive oil
- 1/4 tsp. kosher salt
- 1/4 tsp. ground black pepper
- 1/4 cup marinara sauce
- 17 slices turkey pepperoni
- 3/4 cup chopped drained roasted red peppers
- 1/4 cup sliced red onion
- 2 Tbsps. sliced black olives
Directions:
- Preheat oven to 450°. Line cookie sheet with parchment paper.
- In a food processor with the knife blade attached, pulse half the cauliflower 10 times or to rice-like consistency. (You should have about 6 cups.) Transfer cauliflower to large microwave-safe bowl. Repeat with remaining cauliflower.
- Add water to cauliflower; cover bowl with plastic wrap; heat in microwave oven on high 12 minutes or until very tender. Uncover; let stand 30 minutes. Place cauliflower in a clean kitchen towel; squeeze until very dry.
- In the same bowl, stir steamed cauliflower, garlic, egg whites, 1/2 cup mozzarella cheese, Parmesan cheese, oil, salt and black pepper.
- Press cauliflower mixture into 14-inch circle on prepared cookie sheet. Bake 24 minutes or until browned. Evenly top crust with marinara, remaining 1/4 cup mozzarella cheese, pepperoni, roasted peppers, onion and olives. Bake 7 minutes longer or until cheese melts.
Dietitians Dish – September 20, 2021
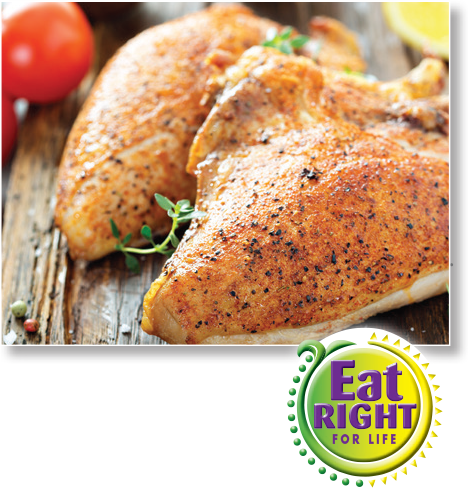
With grocery costs continuing to be affected by the pandemic, it’s never too late to learn how to cook a less expensive cut of meat or poultry item. Instead of the more costly option of boneless, skinless chicken breast, stock up on split chicken breast when it’s on sale. You can always trim off the fat or remove skin and de-bone it before cooking. But, the quality is best if you cook it with the skin on to retain tenderness and moistness. Paired with a simple but flavorful side dish or salad makes a roasted chicken meal an easy choice. If you’re already roasting the chicken in the oven, add some diced root vegetables or potatoes. Sheet pan meals are hands-off cooking and easier clean-up.
That leaves you more time for other activities and family time!
Simple Roasted Chicken Breast
- 4 split chicken breasts (areas of excess thick fat & skin removed)
- 1 Tbsp. extra virgin olive oil
- 1/2 tsp. salt
- 1/2 tsp. pepper
Directions:
- Preheat oven to 350ᵒF. Prepare baking sheet by lining with foil or parchment paper.
- Place chicken breast with bones face down on the tray. Brush with olive oil and sprinkle with salt & pepper.
- Bake for 55-60 minutes, or until internal temperature reaches 165ᵒF. Be sure thermometer doesn’t touch a bone since they absorb more heat.
- Remove any remaining skin and serve with Simply Cucumber Salad. Any extra chicken can be chopped or shredded for another meal.
Simply Cucumber Salad
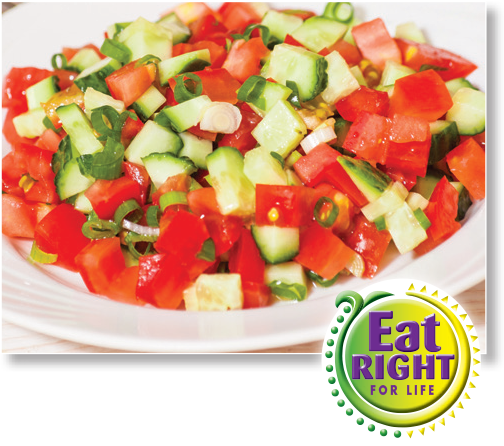
- 2 cups cucumber, diced
- 2 cups grape tomatoes, halved or diced
- 1/4 cup sliced green onion
- 1/4 cup chopped fresh parsley (or 4 tsp. dried parsley)
- 3 Tbsp. red wine vinaigrette dressing
Directions:
- Combine cucumber, tomatoes, onion, parsley and vinaigrette in mixing bowl. Cover and refrigerate until ready to serve.
Dietitians Dish – September 13, 2021
Back-to-School from A to Z !
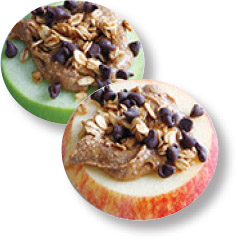
A is for Apple – and the fall growing season is in full swing. Apples are a great source of vitamins A and C. They contain a healthy dose of quercetin, a powerful flavonoid with antioxidant properties, which helps protect the heart and arteries, and may help combat some cancers. So grab a bag and try them a few new ways.
Or, start the day in a sweet way – the family will never know there are extra servings of fruits and veggies in this “milkshake”.
Apple-Celery Shake
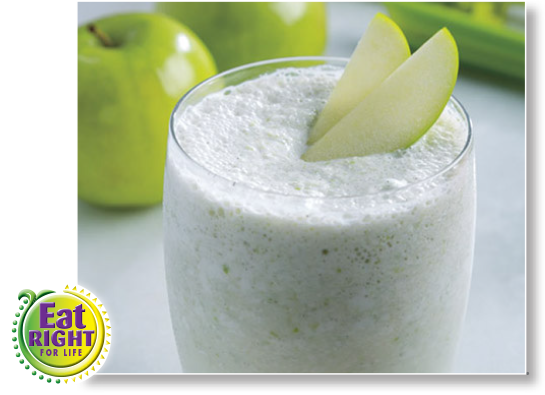
- 1 Granny Smith apples, peeled, cored and cut into 1/2-inch pieces
- 1 medium celery ribs, including leaves, peeled and cut into 1/2-inch pieces
- 1/4 cup low-fat milk (or non-dairy alternative – like soy, almond, or coconut milk)
- 1/4 tsp. vanilla extract
- A dash of almond extract
- A pinch of ground nutmeg
- 2 cups frozen vanilla yogurt
Directions:
- In a blender, blend apples, celery, milk, vanilla extract, almond extract and nutmeg until smooth. Add frozen yogurt and blend again until smooth. Yields 2 servings.
Healthy Baked Apple Chips with Maple- Almond Yogurt Dip
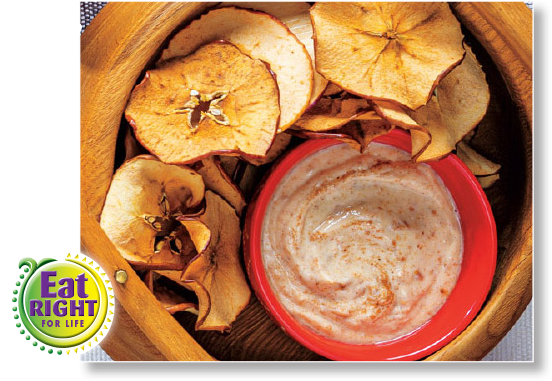
- 2 Fuji or Gala apples, thinly sliced crosswise
- 1 1/2 tsps. Ground cinnamon
- 1 cup plain nonfat Greek yogurt
- 1/4 cup almond butter
- 2 Tbsps. maple syrup
Directions:
- Preheat oven to 225°F; line 2 rimmed baking pans with parchment paper. Place thinly sliced apples in a single layer on prepared pans.
- Sprinkle cinnamon over apples; bake 2 hours or until crisp, rotating pans and turning apples once.
- In a medium bowl, add Greek yogurt and almond butter. Mix until combined, then stir in maple syrup. Serve with apple chips.
Dietitians Dish – September 06, 2021
Back-to-School from A to Z !
Z is for Zucchini. Adding some to your diet means eating your green veggies has never been so easy. With something so versatile and simple to prep, zucchini has many health benefits. Helping reduce blood sugar levels, promoting healthy digestion and improved heart health are just a few. It can also satisfy a variety of things for which you might be craving – savory, crunchy, or sweet.
Stock up on zucchini and store it in the fridge in a plastic bag for 4-5 days. Choose ones with shiny skin (slightly prickly is okay) that is free from cuts or bruising. Do not wash them until you are ready to use. You can cook or bake with zucchini to add extra nutrients and moistness. Serve it with dinner as a better-for-you alternative to French fries or as a major ingredient in your entrée. Look for Zoodle Pad Thai with Shrimp on InSeasonezine.com. It’s also great in baked goods to satisfy sweet cravings.
Try these family-friendly ways to boost intake of Lutein and vitamins A, C & E!
Baked Zucchini Fries
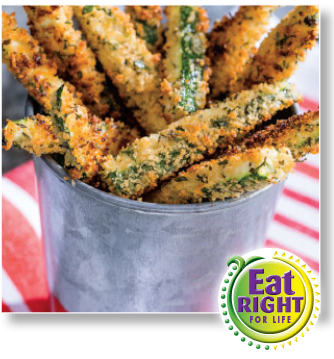
- 2 large egg whites
- 1 cup whole wheat panko breadcrumbs
- 1/4 cup grated Parmesan cheese
- 1 tsp. no salt added Italian seasoning
- 2 medium zucchini, cut into 1/2-inch sticks/wedges
- 1/2 cup low sodium marinara
Directions:
- Preheat oven to 425°. Line 2 rimmed baking pans with parchment paper. In small bowl, whisk egg whites. In separate small bowl, whisk breadcrumbs, cheese and seasoning.
- Dip zucchini in egg whites then in breadcrumb mixture to coat both sides; place in single layer on prepared pans. Spray zucchini with cooking spray. Bake 25 minutes or until golden brown and crisp; serve with marinara.
Chocolate-Zucchini Muffins

- 1-1/4 cups white whole wheat flour
- 1/3 cup unsweetened cocoa powder
- 1 tsp. baking soda
- 1/4 tsp. salt
- 1 large banana, mashed
- 1 large egg
- 1 cup unpacked shredded zucchini, squeezed to remove moisture (about 1 medium zucchini)
- 1/2 cup plain nonfat Greek yogurt
- 1/3 cup honey
- 2 Tbsps. coconut oil, melted
- 1/2 cup dark chocolate chips
Directions:
- Preheat oven to 350°. Line standard 12-cup muffin pan with baking cups or spray cups with cooking spray.
- In medium bowl, whisk flour, cocoa powder, baking soda and salt. In large bowl, whisk banana, egg, zucchini, yogurt, honey and oil until combined; add flour mixture and stir until just combined. Fold in chocolate chips; divide into prepared cups.
- Bake 24 minutes or until toothpick inserted in center of muffins comes out clean.